Fulfilling Kickstarter Orders with ShipStation
This blog originally appeared in its entirety at Pixelmech.com, written by Tom Dellaringa. Tom has self-published independent comics since 2008 and has completed two successful Kickstarter campaigns for his graphic novels, Marooned—A Space Opera in the Wrong Key! & Rock & Tin. His third graphic novel, Pong the Mystic, is in development. He also publishes how-to articles to help other independent artists at his blog.
Wonderful! You’ve just completed a successful Kickstarter (or some other crowdfunding or pre-order campaign) and you’ve been successfully funded. You’ve got that wonderful feeling of elation – until you realize you have to fulfill hundreds (maybe thousands) of orders. Suddenly, a dose of reality hits. How in the world are you going to manage that?!
When I completed my first Kickstarter campaign for Marooned, I had no idea what I was getting into. I had to ship out over 200 large books all over the world. I had prepared with boxes and shipping materials – I had even properly planned for the shipping costs.
A Time Machine Would be Handy
What I did NOT plan for was the time it would take to manually copy and paste orders, print them out on paper, cut them to size and affix them to boxes. Even worse, the hours and HOURS spent at the post office with bundles of packages waiting for each one to be weighed and paid for.
The worst part of the process being international orders and the extra paperwork. UGH.
It took me close to two months to fulfill all the orders, and untold hours of my time. When I closed my second Kickstarter campaign for Rock & Tin, I vowed to find another, better way.
And that better way is ShipStation.
Using ShipStation, I fulfilled around 130 orders in less than two weeks, and I spent almost no time at the post office. And it was the easiest thing in the world.
How It Works
ShipStation partners with all kinds of marketplaces to suck your orders into the system. When you sign up, you get a Stamps.com account as well to handle the postage. So the bottom line is you pull up an order, print out the shipping, affix to your package and drop it off at the Post Office.
Here’s how it worked specifically for me.
ShipStation isn’t connected to Kickstarter (yet), but that’s not really a problem. First I exported all my orders from my backers into .csv format (spreadsheet format). Then I imported them all as “manual orders” into ShipStation. It basically looks like this:
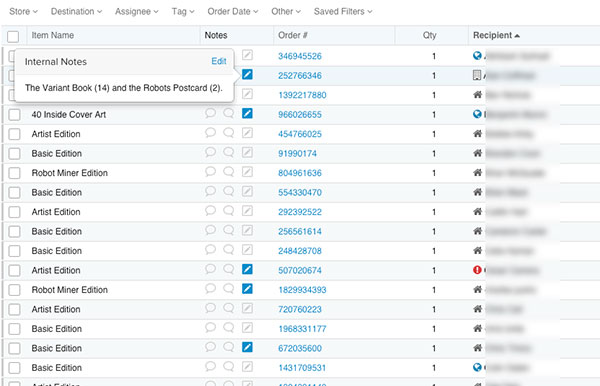
You can customize what columns you want to see. Here I have the backer reward level (item name), I can see notes I left (especially for add-ons, as you can see in the pop-up window), order number, quantity and customer name. I like that in the name, there’s an icon telling you whether it’s a residential, apartment or even international order. The red icon is an address that has not been validated.
Clicking on order gives you a detail view (either full screen or in the right rail) like so:
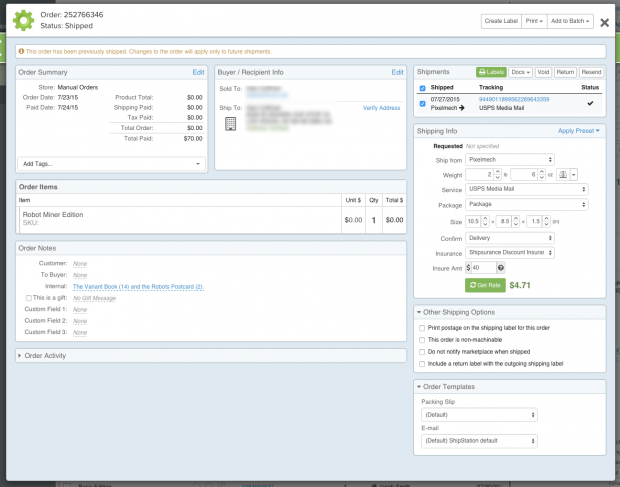
You can see all the information is at your fingertips – including the shipping cost. And I can tell you that I only skimmed the surface of the features available – you can customize and automate things as much as you want.
A closer look at the shipping info panel shows you how you can figure the shipping rate:
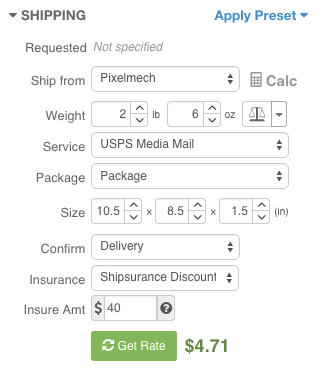
You can save presets for as many types of shipping as you like. You can choose if you want delivery confirmation, or insurance. And note, both the insurance AND the shipping rates you pay are discounted off the retail price! This saves you money on your campaign.
The best thing about all this is that there are no extra forms to fill out EVEN on international orders. It all prints out on ONE label that you affix to your package.
When you print a label, your Stamps.com account is debited, and the order automatically moves to the “shipped” section. And you move on to the next one. It’s that easy. And let me tell you how awesome it is simply walking into the Post Office and dropping off a stack of books at the counter and walking away – it’s like you are cheating at life!
Hook Up All Your Stores
I also took some orders from my StoreEnvy.com store. Because ShipStation supports Store Envy as a sales channel, it was a simple matter to hook them up, and those orders were automatically sucked in, and just as easy to fulfill.

What do I need to use ShipStation?
Not a whole lot – but a few things can help.
You need a scale to weigh your packages properly. If you weigh things wrong, your customers could end up owing postage, and you do NOT want that. I picked up this scale for under $20 and it’s perfect.
You’ll need a credit card if you plan to keep the service beyond the 30-day trial.
Depending on how many packages you are shipping, you may want to invest in a label printer. I ended up not doing that, and just printed them on paper, then taped them to the package. I will say having a label printer would make the process even faster. But they can run around $200-$250 (new at least) so you need to have the volume to justify the cost. Eventually I plan on getting one though.
You at least need a printer to print your labels.
That’s it! The other thing you’ll need is some kind of plan to fill all the leisure time you’ll have after fulfilling your orders – because you are going to steam through them!
I’m happy to answer any questions you might have about the service. And to be clear, ShipStation is NOT paying me or asking me to write this. I wrote this because I love the service, and think it’s an awesome tool for you to use.