Creating Video Content: Pre-Production Gear Prep
If you followed our guide on product photography, there’s a good chance you know what gear you need to take a good photo. That very same gear can be used for your video content, too.
So whether you’re rocking a mid-level DSLR or an iPhone 7+, a lighting rig or a DIY-diffuser + desk lamp, you can rest assured a lot of what you need is probably hanging out around your office/warehouse/room. But, if you want higher quality gear, don’t worry your wallet: you can always rent the equipment you need from a place like BorrowLenses.com.
What to Use
Camera
If you guessed that we’re going to recommend a DSLR or new smartphone (like an iPhone 7+), you’re spot on. The main difference between using these cameras for video content versus photography is literally what button you press.
So what do you need to look out for in a DSLR or smartphone camera? Honestly, we couldn’t have said it better than we did in our blog about product photography gear. Here’s a portion of that section focusing on DSLRs for your reading pleasure (you can also click here to jump straight to that blog and read more on DSLRs and smartphone cameras):
DSLR
- RAW option: This is a setting on your camera that allows you to shoot RAW, or uncompressed, photos that offer you the best picture quality, higher bit depth and creative control.
- Lens: Most DSLRs come with a “kit lens” that offers a focal length (size of lens and angle of view) of 18-50 mm or 18-55 mm. What that means for you and your products as you begin this journey of product photography, is that it is possible to begin shooting your products with the camera body and the kit lens right out of the box. Upgrading your lens might offer you the best quick fix for better photos with your current DSLR.
- Aperture, shutter speed, exposure and white balance: These are all settings that your standard DSLR can adjust manually or automatically. When you take photos in RAW, you’ll be able to change these settings, some even after you take the actual picture.
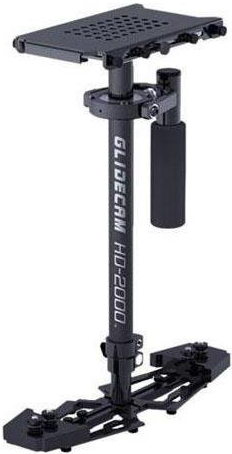
Stabilizer
We wrote about the need for a tripod in our product photography gear blog and while we still believe in the importance of a tripod for shooting a video, we want to put the focus on a stabilizer.
These things are pretty dang cool, y’all. Their main purpose is to keep the camera and your image stable while shooting and moving. If you were walking along, shooting without one, the final product would be shaky and bumpy. With the stablizer, most of that is completely eliminated. When we shoot our videos that involve any bit of movement, we get our camera on one of these rigs and the effect is excellent.
Want to see it in effect? Here’s our Mannequin Challenge video from last year, filmed entirely on a steady cam rig:
We use the Glidecam HD-2000 but if that’s a little pricey, there’s a cheaper version: the very well reviewed LYCAM HD-3000.
As always, play around with your gear before shooting!
Lighting
Lighting is always tricky. Too bright, too soft, too harsh, etc.. And if you’re not an expert on lighting, figuring out what you need and what to do might overwhelm you. We feel the same!
We actually found an amazing guide from Wistia on building your own DIY lighting rigs for ~$100:

Check out their full guide: The Down and Dirty DIY Lighting Kit.
Where to Shoot
The Real World
If you aren’t shooting in a rented or DIY studio (which you can read more on here), you’re probably shooting in the real world. That could mean outside, a giant, open warehouse, a bedroom, etc.. The most important part of shooting out and about is knowing how to light it.
You’ll want to scout the location ahead of time, at around the time you plan on shooting. That way you can figure out where the natural light is coming from, how it’s reflecting off of surrounding objects, and where you’ll need a bounce, diffuser, etc..
Click here for a couple of helpful tips from NoFilmSchool.com.
So get out there with the gear you have and start playing around. Experience is what will make you more comfortable digging in to lighting, shooting, and all the rest, so don’t just watch the videos and read the guides we’ve linked to here. Get into it and see what filming is all about!